Tutorial
In this tutorial we present a practical demonstration of how to use fNIRS Apps and explore some of the common features and concepts. For a brief overview of fNIRS Apps see the Overview page.
The aim of this tutorial is to teach you how to use fNIRS Apps and demonstrate some common concepts such as: how to launch an app, how to pass data to an app, and how to pass parameters to an app. This tutorial aims to demonstrate the different operations an app may make to your data set such as: calculating values from the dataset, modifying the dataset itself, deriving insights from your data and exporting these results in a convenient form. This tutorial is not intended as a guide on the best signal processing to apply to your data, instead it is intended as an overview of the functionality that fNIRS Apps can provide.
To achieve these goals, this tutorial will cover the following topics:
- How to convert your raw data to BIDS format.
- How to generate data quality reports for each measurment.
- How to calculate Scalp Coupling Index and use this metric to modify the status channel in your BIDS dataset.
- How to run a basic GLM pipeline on the data and obtain individual channel results and group level statistics.
What is BIDS?
The Brain Imaging Data Structure (BIDS) is a simple and intuitive way to organize and describe your neuroimaging and behavioral data. It is a well described standard for organising your data. To use fNIRS Apps you must have your data stored according to this specification.
The data
We will use an example dataset which contains measurements from five subjects. Each subject volunteered for a single session. Within each session the subjects performed a finger tapping task. There are three conditions in each run, 1) tapping with the left hand, 2) tapping with the right hand, 3) no tapping. The example dataset in its raw form can be downloaded from here.
Step 0: Install docker
What is docker?
Docker is a software that allows you to create and distribute entirely self reliant programs. Docker is extermely robust and used globally for many applications including managing internet infrastructure, hosting website, and running programs on your personal computer. Utilising docker enables fNIRS Apps to run efficently on everything from your local laptop to a massive server cluster. Chosing to employ a widely used standard such as docker provides stability in the software, excellent documentation, and a large userbase to learn from.
However, to run fNIRS Apps you do not need to know the details about docker. This information is simply provided for the curious. Docker is simply a tool we use, and everything you need to know is contained within this tutorial.
Installation
The only thing needed to run fNIRS Apps is docker. Install docker by following instructions on this site: Get Docker.
On Windows you will run the installer, then on the first start of the docker desktop app it will prompt you to download an additional installer from the microsoft website. After running the second installer restart your PC and then fNIRS Apps should work smoothly.
To run fNIRS Apps you must enter the commands on a terminal prompt.
On Windows you must open the Command Prompt application from the start menu, and you will enter commands in to this program.
On Mac or Nix machines, you must open the terminal and enter the commands in to this program.
Step 1: Converting data from vendor supplied format to BIDS
Data storage
BIDS Apps operate on BIDS datasets. To ease the burden of converting your data to BIDS format we provide a pseudo-fNIRS App to convert from the vendor format to BIDS.
The raw data, as exported from the measurement devices, should be stored in the /sourcedata directory.
Where / represents the base directory of your bids dataset.
So for example, on my computer I have all my datasets in a single directory on the C drive that looks something like this
C
└── Datasets
    ├── 2020-Visual-Pilot-experiment
    │   └── ...
    ├── 2020-Auditory-Pilot-experiment
    │   └── ...
    ├── 2021-Auditory-experiment
    │   └── ...
    ├── 2021-Better-auditory-experiment
    │   └── ...
    └── 2021-Tapping-experiment
        └── ...
So in this example, we would say that C:\Datasets\2021-Tapping-experiment is the base directory of the tapping dataset.
As such we must place our raw data in the sourcedata directory within the base dataset directory.
The source data must be organised according to the BIDS specification.
So the sourcedata directory will contain directories for each subject.
And then the data as exported by the vendor must be placed in a nirs directory.
This should then look something like:
C:\Datasets\2021-Tapping-experiment
│
└── sourcedata
    ├── sub-01
    │   └── nirs
    │       └── 2020-01-01_001     (use the vendor exported format for these directories)
    │           ├── NIRS-2020-01-01_001.dat
    │           ├── NIRS-2020-01-01_001.evt
    │           ├── ...
    │
    ├── sub-02
    │   └── nirs
    │       └── 2020-01-02_002
    │           ├── NIRS-2020-01-02_002.dat
    │           ├── NIRS-2020-01-02_002.evt
    │           ├── ...
    :
    :
    └── sub-XX
        └── nirs
            └── 2020-01-05_005
                ├── NIRS-2020-01-05_005.dat
                ├── NIRS-2020-01-05_005.evt
                ├── ...
                └── NIRS-2020-01-05_005_probeInfo.mat
Once you have your data organised like this, then we can use our first fNIRS App to convert the source data to a fully formatted BIDS dataset. See this repository for an example of how to organise your source data for conversion to BIDS.
Convert from sourcedata to BIDS
Now we can run our first fNIRS App.
To run the app we call the program docker run and provide it with the necessary arguments.
For this first step we need to tell the app where the bids dataset resides, and which app we wish to run.
To inform the app where the bids dataset resides we use the -v option.
This option specifies the data location and destination name seperated by a :.
For all fNIRS Apps destination name must always be /bids_dataset.
So to pass our tutorial tapping dataset to the app we would use the command -v C:\Datasets\2021-Tapping-experiment:/bids_dataset.
Note that on a Mac computer the path to your data would have slashes going the other way abd be something like -v /home/rob-luke/datasets/2021-Tapping-experiment:/bids_dataset
Simillarly we must tell docker which app we wish to use.
Each app has a unique name.
First we will use the Sourcedata to BIDS App,
which has the unique name ghcr.io/rob-luke/fnirs-apps-sourcedata2bids/app.
Finally, we must inform the app what the dataset task was.
For this example we will use the task label tapping.
This is passed in as an argument to the app.
Arguments start with two dashes, then the argument name, followed by the argument value.
So for this example we will use --task-label tapping
Putting this all together we run the following command to convert our source data to a BIDS dataset. Note that on the first run this command will take a few minutes to run as it needs to automatically download the necessary files, this will not happen on subsequent runs, so it will run faster the second time.
docker run -v C:\Datasets\2021-Tapping-experiment:/bids_dataset ghcr.io/rob-luke/fnirs-apps-sourcedata2bids/app --task-label tapping
This should then print out various useful information as it processes your dataset, it may take a few minutes. Once it is complete, the bids dataset directory will looks like:
C:\Datasets\2021-Tapping-experiment
├── dataset_description.json
├── participants.json
├── participants.tsv
├── sourcedata
│   └── ...
├── sub-01
│   ├── sub-01_scans.tsv
│   └── nirs
│       ├── sub-01_coordsystem.json
│       ├── sub-01_optodes.tsv
│       ├── sub-01_task-tapping_channels.tsv
│       ├── sub-01_task-tapping_events.tsv
│       ├── sub-01_task-tapping_nirs.json
│       └── sub-01_task-tapping_nirs.snirf
├── sub-02
│   └── ... (not expanded as simillar to sub-01)
├── sub-03
│   └── ...
├── sub-04
│   └── ...
└── sub-05
    └── ...
As you can see, the dataset description, participant, and subject measurement files have been created. The original data has also been converted to SNIRF format, as required by the BIDS standard.
However, if we were to open up the events file, it would contain the trigger numbers only. It can be useful to also encode the name of each event, this makes it easier to understand the dataset. We also wish to encode the duration of the stimulus, as this is handy for downstream analysis. So we can run the fNIRS App again, but this time specifying the relation between trigger numbers and conditions, and the stimulus duration.
docker run -v C:\Datasets\2021-Tapping-experiment:/bids_dataset ghcr.io/rob-luke/fnirs-apps-sourcedata2bids/app --task-label tapping --events "{\"1\":\"Control\", \"2\":\"Tapping/Left\", \"3\":\"Tapping/Right\"}" --duration 5
If we open up the sub-01_task-tapping_events.tsv now it would look something like:
onset	  duration   trial_type       value    sample
61.824	  5.0        Tapping/Left     2	       483
87.296	  5.0        Control          1	       682
117.632	  5.0        Tapping/Right    3	       919
146.816	  5.0        Tapping/Right    3	       1147
...
Thus we can confirm that the app correctly understood our arguments, and that the dataset is correctly formatted. Now we can move on to using fNIRS Apps with our data!
Bonus step: validate the dataset
You can validate that the dataset is indeed correctly formatted according to the BIDS specification by using the validator tool at bids.robertluke.net.
Once the fNIRS BIDS specification is accepted you will be able to use the official validator.
Step 2: Generate a quality report for each measurement
Now that we have a correctly formatted dataset you can use any of the fNIRS Apps. For this tutorial we shall first use the fNIRS App: Quality Reports to generate quality reports for each file.
The quality reports are saved as html files that can be viewed using any web browser. As with the app above, we need to provide this app with the location of the dataset and the name of the app to run. We will also tell the app to show any channels with a scalp coupling index below 0.6 as bad, and any segments with a peak power below 0.7 as bad. So for this tutorial we run:
docker run -v C:\Datasets\2021-Tapping-experiment:/bids_dataset ghcr.io/rob-luke/fnirs-apps-quality-reports/app --sci-threshold 0.6 --pp-threshold 0.7
This will generate a report for each measurement.
These reports will be placed in the C:\Datasets\2021-Tapping-experiment\derivatives\fnirs-apps-quality-reports directory.
Any data that is generated from the bids dataset will be placed in a derivatives subdirectory.
See here for what the report will look like for participant 02.
These reports are convenient to get an overview of your data collection procedure and identify if data collection was conducted correctly. It also allows you to visually assess if any channels have poor data quality. For example the fifth image (shown below for convenience), shows the distribution of scalp coupling index values for the measurement. From this we can see that a single channel pair seems to have poor data quality, and that a threshold of 0.6 would be appropriate to exclude this channel.

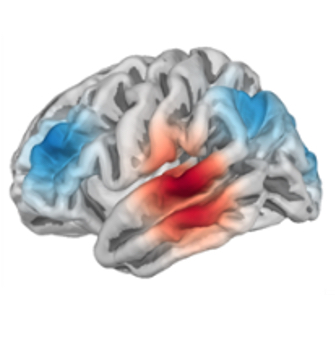
The report also shows the location of the bad channel (marked in red).

The report also shows the quality of the channel over the duration of the measurement and we can observe that is bad throughout the whole recording.

Reports also show other details of the recording such as power spectral density, peak power, etc that are beyond the scope of this tutorial. However, from this report we identify that channels with a scalp coupling index below 0.6 should be excluded.
Step 3: Update the BIDS dataset with information about channel quality
The BIDS specification contains a field where you can mark the channel status as good or bad. This is useful for imforming downstream processing. The report above informed us that channels with a scalp coupling index below 0.6 should be considered bad. Now we wish to update the channel status in the BIDS dataset with this information, i.e., we wish to permanently mark in the BIDS dataset that all channels with a scalp coupling index below 0.6 are bad.
In this tutorial we will set the channel status based on the scalp coupling index using the fNIRS App: Scalp Coupling Index. To run this app we use the command:
docker run -v C:\Datasets\2021-Tapping-experiment:/bids_dataset ghcr.io/rob-luke/fnirs-apps-scalp-coupling-index/app --threshold 0.6
This will process each measurement in turn and update the channel information.
It will not create a sub directory in the derivatives folder.
Instead the channels.tsv files will be updated.
For example sub-01_task-tapping_channels.tsv should now contain two additional columns SCI and status.
name          type              source  detector   wavelength_nominal   units  sampling_frequency  status  SCI
S1_D1 760     NIRSCWAMPLITUDE   S1      D1         760.0                V      7.8125              True    0.6445138821674384
S1_D1 850     NIRSCWAMPLITUDE   S1      D1         850.0                V      7.8125              True    0.6445138821674384
S1_D2 760     NIRSCWAMPLITUDE   S1      D2         760.0                V      7.8125              True    0.8285581397908286
Bonus step: run an app on a subset of subjects
You may wish to only mark channels in a subset of subjects.
You can use the --participant_label to specify which participants to run the app on.
This is a standard argument that is available in all BIDS Apps.
To run the app on just participant 03 you would append --participant_label 03 to the command.
Or to run on just subjects 01, 02, and 05 you would run the full command:
docker run -v C:\Datasets\2021-Tapping-experiment:/bids_dataset ghcr.io/rob-luke/fnirs-apps-scalp-coupling-index/app --participant-label [01 02 05] --threshold 0.6
Step 4: Run a GLM pipeline on the dataset
Now that we have an understanding of our dataset and have marked appropriate channels as bad, we can run a simple analysis. More complex fNIRS Apps may exist, but this provide an infomative example.
We will run the fNIRS App: GLM Pipeline. Usually even the simplest of pipelines would require you to input a multitude of information in a script. However, due to the rich nature of the BIDS metadata structure the app automatically knows about the duration of the stimulus, quality of channels, stimulus names and timing, location of channels, etc. Which allows for an efficent (an less error prone) interface. As such, we can run a simple pipeline using a simple command.
As an extension to the examples above, in this step we will specify the exact version
of the app we wish to use.
By default the latest version will be downloaded on your first run,
but sometimes you may wish to recreate an exact analysis.
To specify the version we append it to the end of the app name.
So in this example the app name will become ghcr.io/rob-luke/fnirs-apps-glm-pipeline/app:v0.1.0.
And the entire command is:
docker run -v C:\Datasets\2021-Tapping-experiment:/bids_dataset:/bids_dataset ghcr.io/rob-luke/fnirs-apps-glm-pipeline/app:v0.1.0
This will convert the data to optical density, then haemoglobin concentration.
It will build a design matrix from the experiment events and include short channels as regressors of no interest.
It will then run the GLM and export a CSV of results per participant to the directory C:\Datasets\2021-Tapping-experiment\derivatives\fnirs-apps-glm-pipeline.
It will also run a mixed effect group level model using all channels as a single region of interest,
and the statistical result will be exported as a txt file that looks like:
                             Mixed Linear Model Regression Results
================================================================================================
Model:                          MixedLM               Dependent Variable:               theta
No. Observations:               30                    Method:                           REML
No. Groups:                     5                     Scale:                            5.9039
Min. group size:                6                     Log-Likelihood:                   -60.1903
Max. group size:                6                     Converged:                        Yes
Mean group size:                6.0
------------------------------------------------------------------------------------------------
                                                      Coef.  Std.Err.   z    P>|z| [0.025 0.975]
------------------------------------------------------------------------------------------------
ROI[AllChannels]:Condition[Control]:Chroma[hbo]       -0.428    1.087 -0.394 0.694 -2.558  1.702
ROI[AllChannels]:Condition[Tapping/Left]:Chroma[hbo]   6.159    1.087  5.668 0.000  4.030  8.289
ROI[AllChannels]:Condition[Tapping/Right]:Chroma[hbo]  6.345    1.087  5.839 0.000  4.215  8.475
ROI[AllChannels]:Condition[Control]:Chroma[hbr]        0.090    1.087  0.083 0.934 -2.040  2.220
ROI[AllChannels]:Condition[Tapping/Left]:Chroma[hbr]  -2.872    1.087 -2.643 0.008 -5.002 -0.743
ROI[AllChannels]:Condition[Tapping/Right]:Chroma[hbr] -2.825    1.087 -2.600 0.009 -4.955 -0.695
Group Var                                              0.000
================================================================================================
From this output we observe that the control condition does not have a significant response in HbO or HbR. And that the tapping ellicits a response regardless of which hand is used, and that the response is of similar magnitude.
Conclusion
We have demonstrated how to create a BIDS dataset from raw data. We have seen how to create derivative reports and results from the data, and how to modify the dataset itself.
Most significantly, we have demonstrated how to run an app, and how to pass arguments to apps. We have seen that you can specify a single subject to run the app on, or the whole dataset.
Now go explore the fNIRS Apps ecosystem. Create an app and email rob @ fnirs-apps.org to have yours added to the list.